Tuesday, March 4, 2014

EventTracker: Creating a Chess Clock for Faculty Meetings and Other Events

Being a university professor, I sit through a lot of meetings. It is not unusual for one or two people to dominate a meeting, but to be fair I really don't think most of the time they know they're doing it. But, sometimes I wish each person at the meeting had one of those timers that chess players use. You know, the one with a clock for each player that tracks how much time each is taking during the match. Wouldn't it be great, I think to myself as I sit there, if everyone at the meeting had to start a clock each time they started to speak? Then, at the end of the meeting we could tell how much time each of us spent talking. Hey, maybe it would encourage a little more listening!

This little daydream has inspired my next LiveCode project - an app that allows someone to document who is at a meeting, when and how often they talk, and how long they talk.

Here's a description of the basic design. You show up at a meeting, take a look around the room, and quickly enter everyone's name into a text field. Most meetings I attend have about 10-15 people, so this wouldn't take very long. Then, in the blink of an eye, a set of unique buttons appears on the screen, one with each person's name on the list. Someone else quickly shows up at the last minute? Just add their name to the list and tap the create button again to update. You also have the option to sort the list.

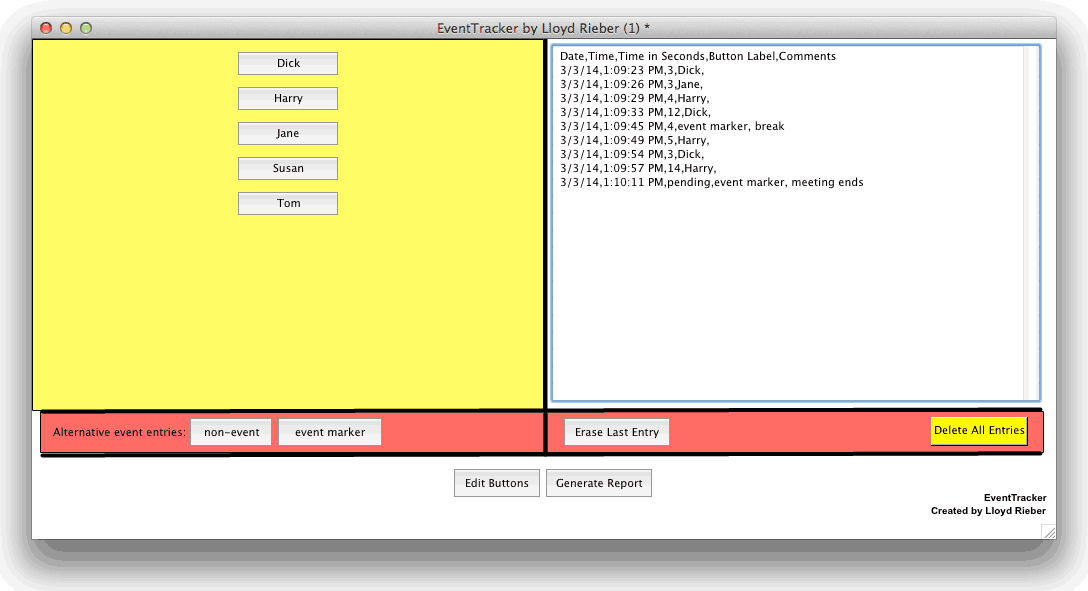
Then, during the meeting, as different people speak, you just tap the button with their name and their name and a date/time stamp are added to a text field. You can also edit the text field if you like, such as by adding some comments to the end of any of the text entries.

When the meeting is over, you can generate a quick report of who spoke how often and for how long -- just summative stuff. But, you could also copy all of the raw data and paste it into Excel or SPSS for a more sophisticated analysis.

Of course, a tool like this could be used for all sorts of things, such as the following:
  • Sports: Which side controls the ball during a basketball game and for how long?
  • Nature: Which birds you see at a bird feeder during the day and how long they feed?
  • Politics: Which panelists or guests on a Sunday morning news show talk when and for how long?
  • Young children's behavior patterns: What a young child does during a specific hour of the day and for how long?
  • Television: When particular commercials come on during a favorite program and for how long? 
  • Education: Who participates in a small group discussion?
So, I'm calling this app "EventTracker" - here is a screen shot:

[ Get the free LiveCode Community version. ]

 https://drive.google.com/file/d/0B3W_1u8Y2RLRVGVDYk5EZ3hKVnM/edit?usp=sharing


This is really just an offshoot of the Classroom Observation Tool I wrote about previously. But, there are some key differences. For example, the design of this app records the time for each single event, whereas the Classroom Observation Tool allowed the user to string together a series of markers before applying a time stamp. The most significant difference, I think, is that this app takes advantage of the fact that you can create a script to copy and paste any object -- such as a button -- within the program.

Copying and Pasting Buttons with Code


OK, let's consider how copying and pasting buttons with code is done. To demonstrate, I've built another LiveCode stack with two cards -- a main card and a card for a library. This stack will help explain the key ideas which I use in the EventTracker app. Here's a screen shot:


[ Get the free LiveCode Community version. ]


On the library card (not shown), I've placed a single button called "template." On the main card, I have several buttons with progressively more complex code. The first is titled "Version 1: copy/paste 1 button" -- here's the script:

on mouseUp
   copy button "template" on card "library" to this card
   set the location of button "template" to 100,50
   set name of button "template" to "New Button"
   set label of button "New Button" to "New Button"
end mouseUp

Line 1 copies and pastes the "template" button from the library card to the main card. It then moves this freshly pasted button to the top, left position of the screen, as denoted by 100,50 (100 pixels from the left side and 50 pixels from the top).

Line 3 renames the button as "New Button," and line 4 gives it the label "New Button."

What if we want more than just one new button? Well, let's repeat this process a few times in a second version of the script found in the button titled "Version 2: copy/paste 3 buttons":

on mouseUp
     put 50 into y
     repeat 3 times
      copy button "template" on card "library" to this card
      set the location of button "template" to 100,y
      put item 2 of the location of button "template" into y
      set name of button "template" to "New Button"
      set label of button "New Button" to "New Button"
      add 30 to y
   end repeat
end mouseUp

I first create a local variable "y" and put the value 50 into it. This will be used to indicate how far down the first copied and pasted button should be placed.

I then have a block of code that I repeat three times just for illustration purposes. It's almost identical to the version 1 script, except that it takes into account the fact that buttons 2 and 3 have to be placed slightly further down on the card after they are pasted. So, I just arbitrarily added 30 to y at the end of each repeat. Button 2 is placed at location 100,80 and Button 3 is placed at location 100,110.

OK, this is all well and good, but how do I get unique names into each of the new buttons. Version 3 of the script (in the button "Copy/Paste Button") takes care of this by relying on a text field called "names." It looks at all of the names entered into the field and creates a unique button for each:

on mouseUp
   put 50 into y
   repeat with i = 1 to the number of lines in field "names"
      put line i of field "names" into varName
      copy button "template" on card "library" to this card
      set the location of button "template" to 100,y
      put item 2 of the location of button "template" into y
      set name of button "template" to varName
      set label of button varName to varName
   add 10+height of button "template" on card "library" to y
   end repeat
end mouseUp

Instead of just repeating three times, this script repeats for as many names that appear in the field. During each repeat loop, it puts the name of the next person on the list into a local variable called "varName," with help from another local variable "i" that is keeping track of which line of the text field (and hence which person's name) is being considered.

The button "Delete All Buttons" does just that - it deletes the buttons. This button relies on another field "previous names" to do this accurately. I refer below to the "previous names" field as a "shadow field" because it is hidden in the final version and works "in the shadows." The list of names is copied and pasted to the "previous names" field right before the group of buttons is created from the list of names. When the button group needs to be updated, the first thing I do is delete all of the existing buttons by referring to the "previous names" field. 

Features of the Final Version


OK, let's take a look at the final version of the app. The final version has a lot of other interesting features besides the copying and pasting of buttons with code.

Distributing the Buttons Evenly


I was tempted to take the easy way out and just have the buttons -- no matter how many -- begin displaying in the top left of the card and down until a first column filled, then start a second column. However, I decided it would be cool to distribute the buttons evenly in the designated space on the card. The designated space is the left half of the card. This was fun to do and created a little brain teaser for me involving some simple mathematics. A total of 10 buttons fit well in one column. So, if there were 10 or less buttons, I wanted those to be shown in a column in the exact middle of the designated space.

When there are more than 10 buttons, but no more than 20, then I figured that the spacing would need to be the width of the stack divided by 2, and then take and divide that number by 3, or (w/2)/3 where w is the width of the stack.

When there are more than 20 buttons, but no more than 30, then the spacing needs to be the width of the stack divided by 8.

When there are more than 30 buttons, but no more than 40, then the spacing needs to be the width of the stack divided by 16. However, the first column starts w/8 from the left edge of the screen.

I added some code to catch if more than 40 names or events are entered. If this happens, a short message pops up for 2 seconds to let the user know about the 40 event limit.

Use of "Shadow Fields"


I am finding myself using what I personally call "Shadow Fields" to facilitate projects such as this. Shadow fields are simply fields that help out various scripts in various ways, but they aren't visible to the user -- they are working "in the shadows."

I have two particular noteworthy examples at work in this app. The first is the field called "previous names" that I've already referred to in this post. As soon as the list of events is created and settled upon, I use the following script in the button "Generate Buttons" to copy the events from the field "names" and paste them into the field "previous names":

   put field "names" into field "previous names"

This acts as a way to preserve the current list of button labels, which is important for many of the app's scripts, such as when all the event buttons need to be deleted, as I've already mentioned.

The second shadow field I use in this application is called "datastreamSeconds," which works closely with the field "datastream," which is the field containing the data log (on the right side of the screen). The field "datastreamSeconds" is used to assist in figuring out the time in seconds for each event on the fly. For example, as you run the app, notice how the event in the last line shows "pending" for the time and then is updated with the number of seconds as soon as the next event is logged. The field ""datastreamSeconds" maintains a log of the time for each event in seconds using the function "seconds."At first, I tried keeping track of this information using a set of variables, but this proved too clunky, especially when you consider that I always give the user the option to erase the last entry. To compute the time for a particular event, I just subtract the time of one event with the next event. To see how it works, just turn on the visibility of the field "datastreamSeconds" using the Application Browser tool.

Generating a Summary Report


Like a lot of my projects, I like to rely on other tools, such as Excel, do the heavy lifting on other tasks or needs, such as generating reports. So, the list of events generated in this app is "Excel Ready" in the sense that one can copy and paste the lines in the field directly into Excel. Then, using the "Text to Columns" option in Excel, you can distribute the comma-separated data into individual columns. But, I thought it would be good to quickly give the user the most basic summary statistics: frequency of each event (i.e. person), and total time of each event. 

Here is the complete script for the button "Generate Report," with my explanation coming right after:

on mouseUp
   show field "report"
   hide me
   hide field "datastream"
   hide button "non-event"
   hide button "event marker"
   hide button "Edit Buttons"
   hide button "Erase Last Entry"
   hide button "Delete All Entries"
   show button "close report"
   put empty into field "report"
   put "Excel Ready Format" into line 1 of field report
   put "Button Label, Frequency, Total Time (Seconds)" into line 2 of field report
   repeat with i = 1 to the number of lines in field "previous names"
      put line i of field "previous names" into varTempName
     
      put 0 into varCount
      repeat with j = 2 to the number of lines in field "datastream"
         if item 4 of line j of field "datastream" = varTempName then add 1 to varCount
      end repeat

     
      put 0 into varTimeTotal
      repeat with k = 2 to the number of lines in field "datastream"-1
         if item 4 of line k of field "datastream" = varTempName then
            add item 3 of line k of field "datastream" to varTimeTotal
         end if
      end repeat

     
      put varTempName&","&varCount&","&varTimeTotal into line i+2 of field "report"
     
   end repeat
  
end mouseUp
There are three important loops here, each with its own repeat command. I color coded them to make them easier to see and understand. First, there is an overall loop (the start and end points color coded blue) that repeats for as many buttons there are. For example, let's imagine we have five people at a meeting: Tom, Dick, Harry, Susan, and Jane. Each person's name, in succession (i.e. once per loop), is put into a local variable "varTempName." Within this loop are two independent loops that look for that person's name. 

The first (color coded green) just looks to see how many times that person's name is listed in the field "datastream." The local variable "varCount" is incremented by one each time the name is found.

The second loop (color coded orange) also looks to see if the person's name is mentioned in each line of the field "datastream," but it then takes item 4 of the line containing the number of seconds for that event and adds it to another local variable called "varTimeTotal".

The second to last line of the blue loop puts the summary information for each person on a unique line in the field "report."

I also put this summary information in "Excel ready" format so that one could easily create graphs or charts using Excel.

Option to Sort the List


Sorting a list of information is amazingly easy to do, thanks to the fact that LiveCode has a "sort" command:

     sort field "names" ascending text

However, I wanted to give the user the option of sorting. So, I added a checkmark button called "sort." The "hilite" property is used detect whether the button is checked or unchecked (i.e. true or false):

   if the hilite of button "sort" is true then
      sort field "names" ascending text
   end if

Search and Destroy Empty Lines


I found that errors occurred if the user leaves any blank lines after editing the button list. In short, a blank line creates a button without a name, which is problematic for many reasons. So, I had to create some script to "search and destroy" any blank lines. Early on, I wrote this script in the "Generate Buttons":

   put 0 into c
   repeat with i = 1 to the number of lines in field "names"
      if line i of field "names" = "" then add 1 to c
   end repeat
   repeat c times
      delete line 1 of field "names"
   end repeat

This worked great, but only on the condition that the list is always sorted alphabetically first -- by doing so the blank lines "rise" to the top of the list. This script does not work if the list remains unsorted, an option I decided late in my design. So, I had to come up with a script that work would either way.

My first solution did not work, though I remain a little baffled as to why:

   repeat with i = 1 to the number of lines in field "names"
      if line i of field "names" = "" then delete line i of field "names"
   end repeat

This "kind of" works, but not reliably. It will catch a stray empty line, but if there are two or more empty lines in a row, it does not reliably delete them all. So, I came up with the following script that, although somewhat inelegant, seems to work great:

   put false into flag
   repeat until flag is true
      repeat with i = 1 to the number of lines in field "names"
         if line i of field "names" = "" then delete line i of field "names"
      end repeat
      put true into flag
      repeat with i = 1 to the number of lines in field "names"
         if line i of field "names" = "" then put false into flag
      end repeat
   end repeat

This again has a total of three loops, with again two loops inside of one loop. Basically, this combines my initial script with code to repeat so long as there continues to be a blank line in the list. First, I set a local variable "flag" to false and runs that first "search and destroy" script that almost works. Then I "put true into flag" with the hope that all blank lines are gone. But, I then run another loops that searches for blank lines. If it finds one, it sets flag back to false at which point the first loop (starting with "repeat until flag is true") runs again. It continues this until all blank lines are gone.

Interestingly, in testing this out, it never seems to take more than a total of 4 loops to "eradicate" all of the blank lines, no matter how many blank lines I include or where I include them. I obviously don't understand completely the nuances of the "delete line" command, but this script does the job nonetheless.

Final Thoughts


This app was yet another weekend project. I don't think I spent more than about 4 hours on it. This again speaks to the power of LiveCode as a prototyping tool. Obviously, much more work could be devoted to this app, its graphic design being just one example. As always, if I were to create a standalone application, I'd have to add the script that saves the data to a text file. But, when just left as a LiveCode file, the names and data log remain in their respective fields between sessions.

As I close this blog posting, you might be wondering how much I tend to dominate meetings. My humble response is that I am a model of restraint, no matter how spirited the conversation. (Yeah, right!) Well, at least I've proved in this post that I am thinking about my own talking and listening behaviors. And I hypothesize that if you reflect on whether or not you are talking too much during a meeting, you are likely to talk less and listen more. Perhaps I should collect some data to test this hypothesis.

Wednesday, February 19, 2014

Another LiveCode First Project: Follow the Bouncing Ball

I continue to introduce faculty and students at UGA to LiveCode. For a recent workshop, I came up with another first project example, which I call "Follow the Bouncing Ball." This is the one that the attendees voted to have me build for them during the workshop.

It's a very graphical project where an animated soccer ball bounces around the screen based on some information provided by the user. This information is simply the horizontal and vertical speed of the ball.

I made a YouTube video of me demonstrating how to build this project from scratch, so I'm not bothering to go into any detail here on how it works.

Here is a snapshot of the project:

[ Get the free LiveCode Community version. ]


What is rather cool about this project is that it shows some very fundamental and important physics concepts and principles. It's a fun way to show the hierarchical relationship between an object's location, distance traveled, velocity of the object, and acceleration of the object. The study of a moving object is a great example of rate of change problems. The distance an object travels shows its change in position. The velocity (speed and direction) of an object shows its change in distance over time, and acceleration denotes the change in velocity. This project didn't go as far as demonstrating acceleration, but it did a good job of showing velocity as consisting of both the speed the soccer ball is traveling and direction in which it is moving. Of course, I know I run the risk of alienating people if I go too far with the physics explanations! 

(But, the history of the discovery of calculus is closely tied to dynamic problems such as this. Velocity is the first derivative of distance and acceleration is the second derivative of distance. Ergo, acceleration is the first derivative of velocity. How cool is that!)

I built this project only using local variables in order to try to show the difference between global and local variables. 

Here is the script of the button "Bounce":

on mouseUp
   hide me
  
   put item 1 of the location of button "ball" into x
   put item 2 of the location of button "ball" into y
  
   put line 1 of field "speed" into varSpeedx
   put line 2 of field "speed" into varSpeedy
  
   repeat until the mouseclick
     
      if x > 320 then put -1*varSpeedx into varSpeedx
      if x < 0 then put -1*varSpeedx into varSpeedx
      if y > 480 then put -1*varSpeedy into varSpeedy
      if y < 0 then put -1*varSpeedy into varSpeedy
     
      wait 1 millisecond
      add varSpeedx to x
      add varSpeedy to y
     
      set the location of button "ball" to x, y

   end repeat
  
   show me
  
end mouseUp

Sir Isaac Newton would be proud.


Saturday, January 18, 2014

LiveCode First Projects: Designing a LiveCode Demonstration that Motivates People to Want to Learn How to Code

One of my goals for this semester here at the University of Georgia in my role as Director of Innovation in Teaching and Technology is to introduce LiveCode to the College of Education community. My plan is to conduct a short (about an hour) seminar that demonstrates LiveCode in the context of learning to code. That is, I want to clearly and immediately make the connection between learning LiveCode and learning to code (i.e. program). A typical first project that one usually finds within most tutorials of computer languages is the "Hello world" example where one simply learns how to program the computer to display "Hello World" on the screen. However, I hope to do something much more interesting, so I've come up with a few example projects. I'm calling these "first projects."

Part of my motivation for doing this was inspired by the recent "Hour of Code" promotion which sought to have every K-12 student in American spend one hour learning to program. I also think learning to code is very relevant to supporting STEM (science, technology, engineering, and mathematics) education. In fact, I would argue that computer programming has not been emphasized nearly enough by STEM educators. Plus, I feel that learning to code also brings the arts into the discussion almost immediately given the ease and importance of integrating graphics, sound, music, and video within most programming projects. And what programming project would be complete without attention to technical, narrative, and creative writing? So I consider the language arts a critical part of a STEM education. Adding the arts turns STEM into STEAM, and I like the sound of that.  (Here are two good articles about the need to learn to code from Wired and the Pittsburgh Post-Gazette.)

My objective for this first seminar is less about learning and more about motivation, particularly triggering a sense of confidence and competence. That is, I want people at the end of this seminar to go beyond just saying to themselves "Wow, that's cool!" to also quickly say "I think I can do that!" So, what examples I show are critical. So far, I've come up with three that I think are pretty good.

The first project is a simple mad lib program where four fields are created, one for adjectives, nouns, verbs, and adverbs. Clicking a button chooses one word from each field at random and puts them together in a sentence.

[ Get the free LiveCode Community version. ]


The second is a countdown program that counts from 3 to 0, then triggers the display of "Go!" after 0 is reached. I couch this one in the context of imagining that you have created some sort of race game and you need a counter to let the player know when the race is about to begin.


[ Get the free LiveCode Community version. ]


I also created a second version of this to show a stop light that goes from red to yellow to green, but without changing the program's algorithm (which I like to refer to as the program's "engine").

[ Get the free LiveCode Community version. ]


The third is a simple guessing game. The computer picks a random number from 1 to 3 and it is the player's job to guess what number it is. Not a very fun game, I know, but it does contain at least the seeds of a good guessing game with initial code that is easy to understand.

[ Get the free LiveCode Community version. ]


I'm also considering to use my "Colorful Addendum" that I wrote about back in May as a fourth example. It's a lot of fun to watch and I think the script is easy to understand. But, the script is a little long, so that might be a little "put-offish" to some people.

Here is my "Lesson Plan" for this one hour seminar:

  1. (2 min.) Welcome everyone to the session. The goal is to demonstrate the computer programming environment of LiveCode. Give enough information to describe LiveCode and its history, but keep this very brief as people really won't care too much at this stuff at this point.
  2. (1 min.) Emphasize that LiveCode involves computer programming, also known simply as coding. Mention the "Hour of Code" promotion (and perhaps show the Web site). Make the point that there is much emphasis on STEM (science, technology, engineering, and math; and some add "arts" to turn STEM into STEAM). It is not enough just to use existing software, one must learn how to build software. To do so, one must learn programming. (Perhaps make the point that learning to programming is far too underemphasized in STEM circles, perhaps because there are not enough teachers who are able to teach it.)
  3. (1 min.) Emphasize that one of my reasons for learning LiveCode was because of its strengths in creating native mobile applications (apps) on both iOS (iPhone, iPad) and Android.
  4. (3 min.) Show "Lunar Hotel Shuttle" as an example that I've created.
  5. (3 min.) Consider also showing one or more other examples quickly. My Classroom Observation Research Data Collection (see blog posting from October, 2013) example might be a good one given the academic context of these session. The air traffic controller example found on the LiveCode web site is another good one.
  6. (10 min.) Show briefly all three "first projects" mentioned above, taking care to show each very, very fast. Then, pass out a ballot where people vote for the the project they wish to learn how to make during this session. (Let people vote for more than one if they have more than one favorite.) Collect the ballots and ask someone to tally them up. 
  7. (30 min.) Build the "winning" project from scratch.
  8. (10 min.) End with some discussion and Q&A.
I've already field-tested this seminar by trying it out a few days ago with a group of our very smart, motivated doctoral students who are taking this semester's LDT Doctoral Studio course with Dr. Greg Clinton. I think the session went very well. The LiveCode project the group voted to build was the Mad Libs project. It was their favorite by a large margin. The next favorite project was the Countdown project. Surprisingly, the Guess the Number! project was a distant third.

I decided I will create a YouTube video for each project that a group selects each time I offer the seminar. My YouTube video for creating the Mad Libs project is about 30 minutes in length, which is longer than I would have anticipated. But, I don't think there is any "fat" in the demo, especially because I felt it was important to spend a little extra attention on some of the fundamentals of LiveCode and programming in a few places.
I look forward to presenting this seminar to the College of Education community at the University of Georgia. I'm also going to try to come up with more good "first project" examples. I'd like to come up with a couple that use more graphics.

Saturday, December 7, 2013

LiveCode 6.5 Now Offers Automatic Scaling

LiveCode 6.5 was just released with a new feature that certainly has my attention -- automatic scaling of applications on mobile platforms. The more precise term for this, or at least the one the company is using, is resolution independence.

To learn more, check out the following web site:

http://livecode.com/livecode-6-5/

Better yet, check out this short video:

https://www.youtube.com/watch?v=idctzDFoGj8#t=13

This is a rather big deal. This means that one's application, designed for one screen size such as the iPhone, will now scale automatically if used on the iPad, iPad-mini, or on the myriad of screen sizes found on the Android platform.

Disclaimer: I have not yet tried working with this new feature, so I'm just trusting the company's information at this point.

To take advantage of this feature, only one line of code is needed within a preOpenStack handler:

on preOpenStack
     set the fullscreenmode of this stack to "exactFit"
end preOpenStack

Below is a copy and paste of excerpts about the fullscreenmode property from the LiveCode dictionary:

And I quote...

fullscreenmode

Syntax:
set the fullscreenmode of stack to {empty|"exactFit"|"letterbox"|"noBorder"|"noScale"}
 

Summary:
Sets the full screen scaling mode of a stack.

Examples:
set the fullscreenmode of this stack to empty
set the fullscreenmode of this stack to "noScale"

Use the fullscreenmode property to choose the most appropriate full screen scaling mode for the application.
 

Parameters:
empty - The stack is resized (not scaled) to fit the screen. (default) This is the existing behavior.
"exactFit" - Scale the stack to fill the screen. This stretches the stack if the aspect ratio of the screen does not match that of the stack.
"letterbox" - Scale the stack, preserving the aspect ratio, so all content is visible. Some blank space may remain if the screen and stack aspect ratios do not match.
"noBorder" - Scale the stack to fill the screen, preserving the aspect ratio. If the stack and screen aspect ratios do not match, the left / right or top / bottom extremes of the stack are not visible.
"noScale" - The stack is not scaled, but is centered on the screen instead.

Value:
The fullscreenmode returns the mode to which this property is set.

Comments:
There are multiple ways in which a stack can be resized or scaled to take full advantage of the available screen space. fullscreenmode allows the developer to choose the most appropriate for their application.

Note: The fullscreenmode only takes affect when a stack is full screen. This is the case on mobile platforms where stacks are always full screen, or on the desktop when the fullscreen property of the stack is set to true.

The full screen scaling mode is available on all desktop and mobile platforms and operates independently from Hi-DPI support.


Monday, November 25, 2013

Creating an Autofill Option for a Text Entry

At the University of Georgia we are in the last few weeks of the semester. The project of one of the students working with LiveCode - Russ Palmer, an instructional designer at UGA's College of Pharmacy - uses a text entry for an interesting game involving the memorization of pharmaceutical information. The player must get an exact match in order to be successful, which can be rather daunting given the complexity of drug names. Russ is really not interested in requiring the player to spell everything exactly right. In previous programming languages I've used, there have always been ways to allow for simple spelling errors. LiveCode has two functions that could be used here, namely matchChunk and matchText.

We also thought about either creating a pull-down menu or a list of all the possible terms. That way the player could just choose or click on one. But choosing among a list of items is a very different learning outcome as compared to recalling a certain drug name. But as we continued to talk, we decided what we would really like to have is an autofill function. That way, the player is forced to at least begin typing the appropriate response, but could then choose among the possible entries as the player typed successive letters. Alas, I told Russ, there is no such function available in LiveCode.

Over the last few days, I've been thinking about this autofill option. Given LiveCode's excellent list processing functions I thought it was worth trying my hand at building it. I think I've created an example that does a pretty good job. In fact, I think Russ and I have invented a new kind of question type. So, you've heard of the Likert-type question? Well, now you have the Rieber-Palmer-type question!

Here is a screen snapshot of the program:
[ Get the free LiveCode Community version. ]


The field on the far right shows the "dictionary" for the autofill using a field titled "words" (yes, in hindsight I should have titled it "dictionary"). These are the only words that will appear in the autofill, but the list can be lengthened or shortened as needed. Plus, it would be very easy to make the list dynamic, such as by adding words to it as the program executes.

As the player begins to type a word, LiveCode begins a matching process after each letter is typed. All words in the dictionary that begin with that letter, then two letters, then three letters, etc. appear in a field just below the answer field. The player can then choose to just click on one of the words in the autofill list and that word is then pasted into the answer field.

To demonstrate a working example, I created a little quiz where LiveCode chooses one of the words in the dictionary at random and makes it the answer to a (bogus) question. (This code is in the card script, should you want to take a look.)

Building the Autofill function


There are two main scripts at work here: one that generates the autofill list and the other that tracks what line the player clicks on in the autofill list.

The first script is in the field "answer":

global varWord

on returninfield
   if line 1 of me = varWord then
      show field "correct"
   else
      show field "wrong"
   end if
  
   wait 1 second
   put empty into me
   hide field "autofill"
   opencard
end returninfield

on keyDown theKey
   show field "autofill"
   put theKey after me
   put empty into field "autofill"
  
   repeat with i = 1 to number of lines in field "words"
      put the number of characters in line 1 of me into varChar
      if line 1 of me = char 1 to varChar of line i of field "words" then
         put line i of field "words"&return after field "autofill"
      end if
   end repeat
  
   if the number of lines in field "autofill" > 5 then
      set the vScrollbar of field "autofill" to true
   else
      set the vScrollbar of field "autofill" to false
   end if
  
end keyDown

The first code block - "on returninfield" - is not related to the autofill function. It's only used to take whatever text is currently in the answer field when the user presses the Return key and evaluate it to see if it is a match. Appropriate feedback is given if it is or isn't a match. Then a new word is chosen for the next "question" by executing the openCard command.


on keyDown


The "on keyDown" script is the heart of the autofill function. Everytime the player types a key, it is triggered and the identity of the key pressed is stored in the local variable "theKey". When the first key is pressed, it is so noted and the autofill field is made visible (and the autofill field is emptied before going any further, just in case some residual text is there from a previous question).

Every time a key is pressed, a repeat loop is triggered that repeats for as many words as there are in the dictionary (again, the field titled "words" located on the right-hand side of the screen). The loop uses the variable i as a counter starting at 1 and ending with the total number of lines in the dictionary. For example, when i is 4, line i would refer to the word "basket."

So, let's pretend that the letter "b" was pressed. The next line says to "put the number of characters in line 1 of me into varChar." Of course, "me" refers to the answer field itself. So, at this point, varChar = 1 because only one letter has been typed.

Consider the next line:
if line 1 of me = char 1 to varChar of line i of field "words"

This line looks at each word in the dictionary (line i) and basically asks: Does the word begin with the letters entered so far in the answer text field? Remember, so far, only the letter "b" has been pressed. So, "char 1 to varChar" asks the computer to look at each word in each line starting with the first letter and going to letter varChar. Since varChar = 1, the match simply starts and ends with the first character. So, all words starting with "b" are considered matches. It then puts a copy of each "b" word (along with a return) into the field "autofill," which is located just below the field "answer."

Next, let's pretend that the player typed the letter "e". The same repeat loop is again triggered. This time, varChar = 2 because the letters "be" now appear in the answer field. So, "char 1 to varChar" now asks the computer to look at each word in each line starting with the first letter and going to the second letter. So, all the words starting with "be" are matches.

This pattern continue as the player types in successive letters.

The second script: Clickline


The second script is in the field "autofill". This script allows the player to click on any word in the autofill list and have it entered into the answer field. The script for this is pretty simple and takes advantage of a nifty LiveCode function named "clickline":

on mousedown
   select the clickline
   put the value of the clickLine into line 1 of field "answer"
   hide me
   put empty into me
   focus on card field "answer"
end mousedown

First, it's important to note that the field needs to be set to "lock text" for this script to work. (This is something I did not know at first. It took me about 15 frustrating minutes to discover this fact.) The easiest way to lock the text is to open the property inspector for the field (just double-clicking on the field opens the property inspector), then choose "lock text" in  Basic Properties.

The function "clickline" monitors if a line in the field has been clicked and records which line it is. I then put the value of that line into the field "answer."

The autofill field then is emptied and hidden, and the focus (as denoted by the blinking I-beam) is put back on the field "answer."

One Bug Remains


I am happy with how this autofill function works and I think it does the job. However, one bug remains that I admit I've not been able to solve. When the player deletes a letter, the autofill field does not update as I thought it would. That is, all words currently in the autofill list remain. I'm sure there is a simple explanation to this, but so far it continues to elude me. Fortunately, once you start typing letters again, the function works properly. I think I may need to trap for the delete key with some special code. Perhaps someone reading this blog posting will suggest some other solution.

Addendum 

November 27, 2013

I posted a note about this autofill file to the "Talking LiveCode" forum - here's a link to the topic thread:


Craig Newman and Mark Schonewille replied to it and provided some very valuable assistance and insights. The first, and the simplest, suggestion by Craig is to add the following code to the field "answer" completely resolved the bug:

on backspacekey
   delete the last char of me
   send "keydown" to me
end backspacekey

(I still get confused about how the "send" command works.)

Craig also provided his own version of how to accomplish the autofill feature. I'll be reviewing that approach carefully.

Mark suggested using the "filter" command, a command I did not know existed. It's a very elegant and powerful way to extract elements from a list.

I also noticed another little bug in my program that was easily fixed. I noticed that the entire list of words from the dictionary appear if you backspace all the way to the beginning. So, I added this line of code to the very end of the keydown procedure:

   if me is empty then hide field "autofill"

I've revised my autofill program. Here's the link to it:


Thanks again to Craig and Mark.

Saturday, November 2, 2013

Report from Today's LiveCode Workshop at the AECT Conference in Anaheim

Many thanks to all of the people who came to my LiveCode workshop today at the AECT conference in Anaheim. I really enjoyed teaching the workshop and sharing the "joy of programming" with everyone. Every time I teach LiveCode, I get a little better at it, so I appreciate the friendly attitude of the entire group. I enjoyed and benefited so much by meeting and getting to know such a great group of educational technology professionals. I hope everyone felt their time spent today at the workshop was worthwhile.

Special thanks go to Guanhua Chen, one of our very talented students in our research master's program at the University of Georgia, who graciously volunteered his time to assist me today. He did a fantastic job of jumping from person to person as little problems popped up. I definitely owe Guanhua several lunches back home in Athens.

I've updated my workshop web site in several ways, so I hope others who are learning LiveCode will check it out and use it as a learning tool:


I added several new resources to the site. One thing in particular stands out. In teaching the workshop previously, I found it is difficult for people to really grasp how even version one of Lunar Hotel Shuttle works. I think the obstacle is that there is a lot of code related to the physics of the simulation, plus I show this at the end of the day when everyone's brains are already pretty full of thoughts of coding and scripting. Consequently, people have a hard time seeing the underlying, elegant, structure. So, I put together a much simpler game called "Catch a Number" that uses exactly the same looping structure, but which needs very little code.

This little game demonstrates a very powerful model of scripting for projects where you have some basic script or "engine" being run continuously in the background while the user gets to interact with it various ways. This is in contrast to the more common and simpler programs that "wait" for the user to do something before anything happens.
Here is a screen snapshot of this simple game:
[ Get the free LiveCode Community version. ]


The program immediately begins counting when it is opened, starting at 1. The user then tries to "catch" a number as it flies by, with the number they caught being shown in the bottom text window. You can also pause or restart the game.

Here is a visual of the programming model or logic:


If you go to the Lunar Hotel Shuttle project section of my workshop site, you'll find this corresponds exactly to the model I use in that program.

So, I had a great time today and I hope to present this workshop again next year at the AECT conference in Jacksonville, as well as other venues as well if the opportunities present themselves.


Saturday, October 19, 2013

PersuadeMe: Finally, A Chance to Use My Random Code Generator


For the past two months, I've been totally consumed with a new project called PersuadeMe, funded (very modestly) by the Bill & Melinda Gates Foundation. It's a very cool project, involving a collaboration with many smart, talented people in the College of Education at the University of Georgia:

  • Dr. Donna Alvermann, Professor of Language and Literacy Education
  • Dr. Michael Hannafin, Professor of Educational Technology
  • Larry McCalla, Learning, Design, and Technology Doctoral Student
  • Eunbae Lee, Learning, Design, and Technology Doctoral Student
  • Joseph Johnson, Language and Literacy Education Doctoral Student

Donna is the PI on the project and is a world renowned scholar in language and literacy education. Mike Hannafin is likewise probably among the top five scholars in the instructional technology field and, of course, needs no further introduction to most people reading this blog.

PersuadeMe is a Web-based literacy tool that is designed to help students in grades four through eight engage in writing arguments on issues of interest to them. The tool features an on-line role-playing game in which students act as "Idea Innovators" and "Idea Investors." Innovators must back up their opinions with evidence. We use the stock market as a metaphor for the project where investors choose to fund those ideas they think are the most persuasive, thus driving up the "value" of those ideas. No opinion is considered right or wrong, merely more or less persuasive based on the evidence that is presented.

Here is a 3-minute conceptual video about the project that was a required part of the proposal to the Gates Foundation:


The voice you hear is that of Larry McCalla's, and he gets credit for designing and producing the video itself. (Although I think our proposal was strong, I have a hunch that the reviewers likely started with these videos and based much of their initial judgment on them. Larry deserves much credit for creating a very clear and persuasive video.)

I have many roles on the project, but my dominant role - and the one most pertinent to this blog posting - is as the programmer of the project. Yes, I know what you are thinking: "The project is doomed!" But, not so fast. I think I'm actually doing a pretty good job, even though it doesn't involve LiveCode at all. Instead, I'm programming this in PHP, supported with a mySQL database (with, of course, lots of HTML along the way). This is a proof-of-concept project to build and evalute a working prototype of the concept to show that additional funding is warranted.

Well, we are about to hold our first field test on Monday with a group of 8th graders. So, there is lots of work to do to prepare. One of my tasks is to create a bunch of generic user log-ins that we can put on index cards and distribute to students when they walk in the door. These need to be age and gender neutral, so I'm going to use animal names. I thought I would use the state mammals of the United States -- click here for Web site that I consulted. I took the liberty of reducing the list by generalizing across common types (such as the various dogs, bears, and deer in the list), and here are the resulting 28 animals:
  • moose
  • cat
  • deer
  • bear
  • whale
  • sheep
  • fox
  • panther
  • manatee
  • dolphin
  • horse
  • seal
  • bison
  • squirrel
  • raccoon
  • dog
  • mule
  • sheep
  • beaver
  • coyote
  • armadillo
  • longhorn
  • bat
  • elk
  • marmot
  • orca
  • badget
  • cow

OK, doing that research was fun and I can use these as the user names for all of the participants in our various field-tests. But, I need to also have passwords for each. Now, I could just try to make up some passwords given that I don't need very many -- we will probably have about eight students in our first field test, and maybe 10 or so more in our other field tests. But, it occurred to me that I could use my LiveCode project "Generate Random Codes" (see blog post from April 13, 2013) as a tool to generate these.

I decided to have passwords of seven characters, using lowercase letters and numbers as the raw ingredients (the server we are using doesn't distinguish between upper and lower case letters). I chose seven because the password plus the animal name comes to eight pieces of information, thus making it very unlikely other students would remember it should they happen to glance at another student's card. ("7 plus/minus 2" is the well-known limit of short-term memory.) This will allow a total of unique 78,364,164,096 passwords. I'd say this is more than sufficient! In reality, I only need about 18 for the field tests, so I decided to turn my LiveCode file loose for about 30 minutes and it generated about 5000 of these unique passwords, which I then copied and pasted to a text file.

Here is a screen shot of just some of the passwords generated by the program:

What I will do next is simply start adding the usernames to each line as I create them, saving the text file as I go. If I ever have a need for more passwords (such as assuming we get more funding from Bill and Melinda -- yes, we are on a first name basis), I'll just copy and paste the list back into LiveCode and have it start generating new passwords from there. It's great to finally have some return on my investment in learning LiveCode.

Of course, I've been spending every spare evening and weekend for the past two months working on this project, so please join me in hoping that Bill and Melinda continue to support this project by choosing to fund our next grant proposal. But, even if they don't, my investment in PersuadeMe will be returned many times over by the number of 4th-8th graders who I'm confident will find this to be an engaging and authentic place to write about the issues that matter to them.